In this post, we will learn Laravel 8 Vue.js 3 CRUD tutorial with composition API. In-depth, we will see the CRUD(Create, Read, Update, and Delete) operations with Laravel 8, and Laravel 9 tutorial with Vue.js 3 composition API. So, with this detailed article, we will develop a simple Client management system with a CRUD operations tutorial in Laravel 8 + Vue.js 3 composition API. Let’s just dive into it.
Step 1: Install Laravel 8 or Laravel 9
If you already have installed Laravel 8 or Laravel 9 on your local machine, you can skip this step. You can easily install the fresh version of Laravel 8 or Laravel 9 by running the below command in your terminal. You can give it any name but in this case, we will name it demo-app.
composer create-project --prefer-dist laravel/laravel demo-app
or use the following command to install the specific Laravel version
composer create-project laravel/laravel:^9.0 demo_app
Notes: To install Laravel 9 you need PHP 8.0. So make sure you have installed PHP 8.0 in your local WAMP, LAMP, MAMP, etc.
Step 2: Configure Database
In this step, we need to set the database credentials in the .env file. So grab your database credentials and add them into the .env file as below:
.env
DB_CONNECTION=mysql
DB_HOST=127.0.0.1
DB_PORT=3306
DB_DATABASE=mydatabase
DB_USERNAME=root
DB_PASSWORD=
Step 3: Install Breeze
The Laravel Breeze provides different basic authentication features, including login, registration, password reset, email verification, and password confirmation.
Run the below command to install the breeze Laravel package.
cd demo-app/

composer require laravel/breeze --dev
After running the above command, we need to run the breeze:install command which will create authentication views, routes, controllers, and other resources required for your application. So run the below commands:
php artisan breeze:install
The Laravel Breeze will create CSS, JS & other assets so we need to compile these assets and then run the migrations. So run the below set of commands one by one:
npm install
npm run dev
php artisan migrate
Step 4: Create A Model & Migration
In this step, we will create a Client model with migration which helps us to connect with the clients table so that we can perform the database operations using the model. Run the below command to create a model with -m flag which will create migration automatically along with the model.
php artisan make:model Client -m
Then the two new files will be created in demo-app/app/Models/Client.php and database/migrations/2022_06_11_182739_create_clients_table.php.
In the model add the four fields name, email, address, and website in the fillable array as shown below:
app/Models/Client.php
<?php

namespace App\Models;

use Illuminate\Database\Eloquent\Factories\HasFactory;
use Illuminate\Database\Eloquent\Model;

class Client extends Model
{
    use HasFactory;

    protected $fillable = ['name', 'email', 'address', 'website'];
}
Now, let’s fill up the clients migration, open it, and add the 4 fields into it as below:
database/migrations/2022_06_11_182739_create_clients_table.php
<?php

use Illuminate\Database\Migrations\Migration;
use Illuminate\Database\Schema\Blueprint;
use Illuminate\Support\Facades\Schema;

class CreateClientsTable extends Migration
{
    public function up()
    {
        Schema::create('clients', function (Blueprint $table) {
            $table->id();
            $table->string('name');
            $table->string('email');
            $table->string('address')->nullable();
            $table->string('website')->nullable();
            $table->timestamps();
        });
    }

    public function down()
    {
        Schema::dropIfExists('clients');
    }
}
Now, run the below command to create database tables.
php artisan migrate
Step 5: Create API Resource Controller, API Resource, And Requests
Let’s create an API resource ClientController with --resource, --api, --requests, and with the --model flag.
- The –resource flag will create a controller with predefined empty methods to perform CRUD operations so that we don’t need to create it manually.
- An –api flag will not include
create()andedit()method while generating controller with--resourceflag - The –requests flag is used to create form requests for the store() and update() methods which will use for validation purposes.
- –model is used to add route model binding in controller methods and would like the resource controller’s methods to type-hint a model instance.
Let’s run the command and generate what we need:
php artisan make:controller Api/ClientController --resource --api --requests --model=Client
The above command will generate a new controller file in the app\Http\Controllers\Api\ClientController.php and two new requests files UpdateClientRequest & UpdateClientRequest will be created in the app\Http\Requests\ directory.
Let’s open both requests files and add the below code into it to validate the requests:
app\Http\Requests\StoreClientRequest.php
<?php

namespace App\Http\Requests;

use Illuminate\Foundation\Http\FormRequest;

class StoreClientRequest extends FormRequest
{
    public function authorize()
    {
        return true;
    }

    public function rules()
    {
        return [
            'name' => ['required', 'string'],
            'email' => ['required', 'email'],
            'address' => ['nullable', 'string'],
            'website' => ['nullable', 'url'],
        ];
    }
}
app\Http\Requests\UpdateClientRequest.php
<?php

namespace App\Http\Requests;

use Illuminate\Foundation\Http\FormRequest;

class UpdateClientRequest extends FormRequest
{
    public function authorize()
    {
        return true;
    }

    public function rules()
    {
        return [
            'name' => ['required', 'string'],
            'email' => ['required', 'email'],
            'address' => ['nullable', 'string'],
            'website' => ['nullable', 'url'],
        ];
    }
}
Here, the most important thing to notice is that we have to change the return true; in authorize() method.
Let’s generate the ClientResource class. The Resource is generally used to transform the data.
php artisan make:resource ClientResource
A new file will be created in app\Http\Resources\ClientResource.php and it will look like the below, we don’t need to change anything to it.
app\Http\Resources\ClientResource.php
<?php

namespace App\Http\Resources;

use Illuminate\Http\Resources\Json\JsonResource;

class ClientResource extends JsonResource
{
    public function toArray($request)
    {
        return parent::toArray($request);
    }
}
Let’s add the newly generated resource to the controller and it will look like the below:
app\Http\Controllers\Api\ClientController.php
<?php

namespace App\Http\Controllers\Api;

use App\Http\Controllers\Controller;
use App\Models\Client;
use App\Http\Requests\StoreClientRequest;
use App\Http\Requests\UpdateClientRequest;
use App\Http\Resources\ClientResource;

class ClientController extends Controller
{
    public function index()
    {
        return ClientResource::collection(Client::all());
    }

    public function store(StoreClientRequest $request)
    {
        $client = Client::create($request->validated());

        return new ClientResource($client);
    }

    public function show(Client $client)
    {
        return new ClientResource($client);
    }

    public function update(UpdateClientRequest $request, Client $client)
    {
        $client->update($request->validated());

        return new ClientResource($client);
    }

    public function destroy(Client $client)
    {
        $client->delete();

        return response()->noContent();
    }
}
Step 6: Create API Resource Route
We need to add the single apiResource route in the routes/api.php file to perform the Laravel 8 or Laravel 9 Vue 3 CRUD with composition API. So open it as below:
routes/api.php
<?php

use App\Http\Controllers\Api\ClientController;
use Illuminate\Support\Facades\Route;

Route::apiResource('clients', ClientController::class);
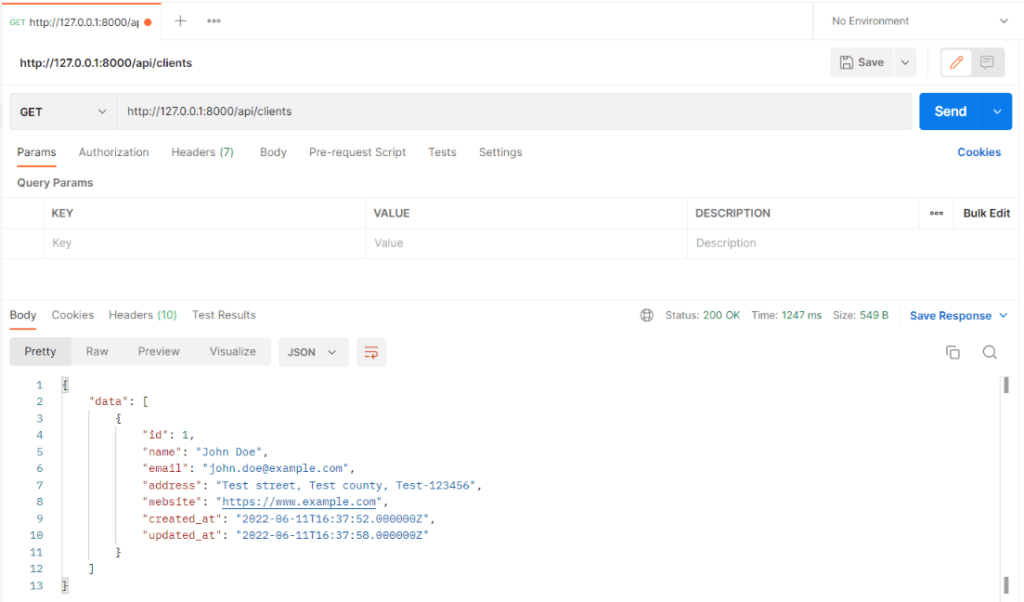
Hurray! we have completed minimal steps to perform the Laravel 8 or Laravel 9 Vue 3 CRUD with composition API. Let’s manually add any entry into the Database and test the API in postman. To test, run the php artisan serve command in terminal and test it
Step 7: Install Vue And Dependencies In Laravel
We have completed the backend part up to now. Now, we need to work on the frontend so let’s install the Vue.js, Vue Loader, and Vue Router in Laravel. To do that run the below command:
npm install vue@next vue-router@next vue-loader@next
The @next will install the latest version of the npm package.
Step 8: First Component In Vue 3 Composition API
Before creating the component, we need to add vue() in the webpack.mix.js so that the vue() part will be compiled by the mix.
Before:
mix.js('resources/js/app.js', 'public/js').postCss(...
After:
mix.js('resources/js/app.js', 'public/js').vue().postCss(...
Now, we need to create our first Vue 3 component. Let’s create a ClientIndex.vue file in resources\js\components\clients\ClientIndex.vue. For now, we will only add “Hello World”, later we will add the dynamic code to it.
resources\js\components\clients\ClientIndex.vue
<template>
    Hello world.
</template>
That’s it for now. Let’s create a Vue route file.
Step 9: Create Vue Route File
In this step, we will create our Vue route file. We need to create three routes: client index, create client and edit client forms. But for now, we will create only the client index route. To do that let’s create an index.js file in resources/js/router/index.js:
resources/js/router/index.js
import { createRouter, createWebHistory } from 'vue-router'

import ClientIndex from '../components/clients/ClientIndex.vue';

const routes = [
    {
        path: '/dashboard',
        name: 'client.index',
        component: ClientIndex
    }
];

export default createRouter({
    history: createWebHistory(),
    routes
})
Step 10: Add App ID And App.js File In Vue
In this step, we need to define the container app Id which will let the Vue js know to render its view inside the container. Let’s add the id='app' to the main Blade file. So open the resources\views\layouts\app.blade.php file and add the id=”app” like below:
<body class="font-sans antialiased">
    <div id="app" class="min-h-screen bg-gray-100">
Then, let’s create a Vue 3 application in the app.js file as per the Vue3 syntax. To do that, open the resources\js\app.js and add the following code to it.
resources\js\app.js
import './bootstrap';

import Alpine from 'alpinejs';

window.Alpine = Alpine;

Alpine.start();

import { createApp } from 'vue';
import router from './router'

import ClientIndex from './components/clients/ClientIndex.vue';

createApp({
    components: {
        ClientIndex
    }
}).use(router).mount('#app')
Now, let’s run the below command to compile it.
npm run dev
Step 12: Add SPA Route & Add Router View In Blade File
Next, we need to add the SPA route in the routes/web.php file. This route will load the Laravel view file which has Vue functionality. So add the following code at the end of the file and our web.php will look like this:
routes/web.php
<?php

use Illuminate\Support\Facades\Route;
Route::get('/', function () {
    return view('welcome');
});

Route::get('/dashboard', function () {
    return view('dashboard');
})->middleware(['auth'])->name('dashboard');

require __DIR__.'/auth.php';

Route::view('/{any}', 'dashboard')
    ->middleware(['auth'])
    ->where('any', '.*');
After this, Let’s change the resources/views/dashboard.blade.php to include the <router-view /> tag:
<x-app-layout>
    <x-slot name="header">
        <h2 class="font-semibold text-xl text-gray-800 leading-tight">
            {{ __('Dashboard') }}
        </h2>
    </x-slot>

    <div class="py-12">
        <div class="max-w-7xl mx-auto sm:px-6 lg:px-8">
            <div class="bg-white overflow-hidden shadow-sm sm:rounded-lg">
                <div class="p-6 bg-white border-b border-gray-200">
                    <router-view />
                </div>
            </div>
        </div>
    </div>
</x-app-layout>
So, now, after logging into our Laravel app and the dashboard should look like this:

Hurray! We have implemented Vue 3 in Laravel 8 or Laravel 9 basic tutorial successfully. Now, we just need to add CRUD into it and we are done. Let’s just crack it.
Step 13: Create Clients CRUD Composable In Vue 3
Here we will create a Client CRUD Composable using Composition API. Composable is a separate file that has all CRUD methods in it and then we will use these methods as required in .vue files. Let’s just create a clients.js file in the resources/js/composables/clients.js directory like:
resources/js/composables/clients.js
import { ref } from 'vue'
import axios from 'axios'
import { useRouter } from 'vue-router'

export default function useClients() {
    const client = ref([])
    const clients = ref([])

    const errors = ref('')
    const router = useRouter()

    const getClients = async () => {
        let response = await axios.get('/api/clients')
        clients.value = response.data.data
    }

    const showClient = async (id) => {
        let response = await axios.get(`/api/clients/${id}`)
        client.value = response.data.data
    }

    const storeClient = async (data) => {
        errors.value = ''
        try {
            await axios.post('/api/clients', data)
            await router.push({ name: 'clients.index' })
        } catch (e) {
            if (e.response.status === 422) {
                for (const key in e.response.data.errors) {
                    errors.value += e.response.data.errors[key][0] + ' ';
                }
            }
        }

    }

    const updateClient = async (id) => {
        errors.value = ''
        try {
            await axios.patch(`/api/clients/${id}`, client.value)
            await router.push({ name: 'clients.index' })
        } catch (e) {
            if (e.response.status === 422) {
                for (const key in e.response.data.errors) {
                    errors.value += e.response.data.errors[key][0] + ' ';
                }
            }
        }
    }

    return {
        errors,
        client,
        clients,
        getClients,
        storeClient,
        showClient,
        updateClient
    }
}
Code Explanation:
- It is a convention to name composable functions starting with the “use” keyword and then camelCase names so we have used
useClient(), you can give any name but it should start with theusekeyword and then the other later should be camelCase. - Then, we have used
ref, it is an object that is used for reactivity. So when we assign any variable, constant with ref then all changes will be tracked and the view will update. - Another thing, like Axios which is used to perform the HTTP requests as we did in Vue 2. Also, we are pushing
client.indexrouter name to change the screen. - Lastly, we have returned all the prepared data.
Step 14: Show Clients Listing Table
It’s time to list out all the clients in a table using Laravel 8 or Laravel 9 Vue.js 3 CRUD tutorial with composition API. Previously, we had added only “Hello World” into it but now we will loop through the client’s data and populate the table. Let’s open it and add the below code:
resources\js\components\clients\ClientIndex.vue
<template>
    <div class="overflow-hidden overflow-x-auto min-w-full align-middle sm:rounded-md">
        <table class="min-w-full border divide-y divide-gray-200">
            <thead>
            <tr>
                <th class="px-6 py-3 bg-gray-50">
                    <span class="text-xs font-medium tracking-wider leading-4 text-left text-gray-500 uppercase">Name</span>
                </th>
                <th class="px-6 py-3 bg-gray-50">
                    <span class="text-xs font-medium tracking-wider leading-4 text-left text-gray-500 uppercase">Email</span>
                </th>
                <th class="px-6 py-3 bg-gray-50">
                    <span class="text-xs font-medium tracking-wider leading-4 text-left text-gray-500 uppercase">Address</span>
                </th>
                <th class="px-6 py-3 bg-gray-50">
                    <span class="text-xs font-medium tracking-wider leading-4 text-left text-gray-500 uppercase">Website</span>
                </th>
            </tr>
            </thead>

            <tbody class="bg-white divide-y divide-gray-200 divide-solid">
            <template v-for="client in clients" :key="client.id">
                <tr class="bg-white">
                    <td class="px-6 py-4 text-sm leading-5 text-gray-900 whitespace-no-wrap">
                        {{ client.name }}
                    </td>
                    <td class="px-6 py-4 text-sm leading-5 text-gray-900 whitespace-no-wrap">
                        {{ client.email }}
                    </td>
                    <td class="px-6 py-4 text-sm leading-5 text-gray-900 whitespace-no-wrap">
                        {{ client.address }}
                    </td>
                    <td class="px-6 py-4 text-sm leading-5 text-gray-900 whitespace-no-wrap">
                        {{ client.website }}
                    </td>
                </tr>
            </template>
            </tbody>
        </table>
    </div>
</template>

<script>
import useClient from '../../composable/clients'
import { onMounted } from 'vue';

export default {
    setup() {
        const { clients, getClients } = useClient()

        onMounted(getClients)

        return {
            clients,
        }
    }
}
</script>
Now run the npm run dev and check the dashboard for output and it should look like the below. Entries might be different as we have added more data for testing.

Step 15: Delete A Client Using Vue 3
In the Composable file resources/js/composable/clients.js we will add one more method destroyClient() which calls the Delete API endpoint. Also, we need to return that method at the bottom:
const destroyClient = async (id) => {
    await axios.delete(`/api/clients/${id}`)
}

return {
    errors,
    client,
    .....
    destroyClient,
}
After that, we can call destroyClient() method from our component. So, in the resources/js/components/companies/ClientIndex.vue we add a Delete button in the template, with the method in the script:
<template>
    <div class="overflow-hidden overflow-x-auto min-w-full align-middle sm:rounded-md">
        <table class="min-w-full border divide-y divide-gray-200">
            ...............

        <td class="px-6 py-4 text-sm text-center leading-5 text-gray-900 whitespace-no-wrap">
            <button @click="deleteClient(client.id)"
                    class="inline-flex items-center px-4 py-2 bg-gray-800 border border-transparent rounded-md font-semibold text-xs text-white uppercase tracking-widest hover:bg-gray-700 active:bg-gray-900 focus:outline-none focus:border-gray-900 focus:ring ring-gray-300 disabled:opacity-25 transition ease-in-out duration-150">
                    Delete
            </button>
        </td>
               .........
        </table>
    </div>
</template>

<script>
import useClient from '../../composable/clients'
import { onMounted } from 'vue';

export default {
    setup() {
        const { clients, getClients, destroyClient } = useClient()

        onMounted(getClients)

        const deleteClient = async (id) => {
            if (!window.confirm('You sure?')) {
                return
            }

            await destroyClient(id)
            await getClients()
        }

        return {
            clients,
            deleteClient
        }
    }
}
</script>
Next, again run the npm run dev and check the dashboard for output and it should look like the below:

Now, if you click on the DELETE button, it will show the confirmation and after pressing OK, it will delete the record and then again it will call the getClients() method to show the latest client’s data.
Step 16: Create A Client Using Vue 3
In this step, first, we will create ClientCreate.vue file in the components directory. We will add the client-create form with the @submit event. So create a file and add the code as below:
resources\js\components\clients\ClientCreate.vue
<template>
    <div class="mt-2 mb-6 text-sm text-red-600" v-if="errors !== ''">
        {{ errors }}
    </div>

    <form class="space-y-6" @submit.prevent="saveClient">
        <div class="space-y-4 rounded-md shadow-sm">
            <div>
                <label for="name" class="block text-sm font-medium text-gray-700">Name</label>
                <div class="mt-1">
                    <input type="text" name="name" id="name"
                           class="block mt-1 w-full rounded-md border-gray-300 shadow-sm focus:border-indigo-300 focus:ring focus:ring-indigo-200 focus:ring-opacity-50"
                           v-model="form.name">
                </div>
            </div>

            <div>
                <label for="email" class="block text-sm font-medium text-gray-700">Email</label>
                <div class="mt-1">
                    <input type="text" name="email" id="email"
                           class="block mt-1 w-full rounded-md border-gray-300 shadow-sm focus:border-indigo-300 focus:ring focus:ring-indigo-200 focus:ring-opacity-50"
                           v-model="form.email">
                </div>
            </div>

            <div>
                <label for="address" class="block text-sm font-medium text-gray-700">Address</label>
                <div class="mt-1">
                    <input type="text" name="address" id="address"
                           class="block mt-1 w-full rounded-md border-gray-300 shadow-sm focus:border-indigo-300 focus:ring focus:ring-indigo-200 focus:ring-opacity-50"
                           v-model="form.address">
                </div>
            </div>

            <div>
                <label for="website" class="block text-sm font-medium text-gray-700">Website</label>
                <div class="mt-1">
                    <input type="text" name="website" id="website"
                           class="block mt-1 w-full rounded-md border-gray-300 shadow-sm focus:border-indigo-300 focus:ring focus:ring-indigo-200 focus:ring-opacity-50"
                           v-model="form.website">
                </div>
            </div>
        </div>

        <button type="submit"
                class="inline-flex items-center px-4 py-2 text-xs font-semibold tracking-widest text-white uppercase bg-gray-800 rounded-md border border-transparent ring-gray-300 transition duration-150 ease-in-out hover:bg-gray-700 active:bg-gray-900 focus:outline-none focus:border-gray-900 focus:ring disabled:opacity-25">
            Create Client
        </button>
    </form>
</template>

<script>
import useClient from '../../composable/clients'
import { reactive } from 'vue'

export default {
    setup() {
        const form = reactive({
            name: '',
            email: '',
            address: '',
            website: ''
        })

        const { errors, storeClient } = useClient()

        const saveClient = async () => {
            await storeClient({ ...form })
        }

        return {
            form,
            errors,
            saveClient
        }
    }
}
</script>
In the above component, the most important part is the <form class="space-y-6" @submit.prevent="saveClient"> method and then each field has v-model="form.[field_name]“, binding it to the form object.
We have added the default values to each form field as below:
const form = reactive({
    name: '',
    email: '',
    address: '',
    website: ''
})
The reactive thing, which we have imported with import { reactive } from the ‘vue’ package, which is used to update the view when the JavaScript object is updated all over the page.
Then, we used the saveClient() method in component method, which then calls the Composable method of createClient().
Let’s now add the “Create Client” route to the resources/js/router/index.js:
import { createRouter, createWebHistory } from 'vue-router'

import ClientIndex from '../components/clients/ClientIndex.vue';
import ClientCreate from '../components/clients/ClientCreate.vue';

const routes = [
    {
        path: '/dashboard',
        name: 'client.index',
        component: ClientIndex
    },
    {
        path: '/client/create',
        name: 'client.create',
        component: ClientCreate
    },
];
Next, we will add a “Create Client” button above the table, with router-link, in the resources/js/components/clients/ClientIndex.vue as below:
<template>
    <div class="flex place-content-end mb-4">
        <div class="px-4 py-2 text-white bg-indigo-600 hover:bg-indigo-700 cursor-pointer">
            <router-link :to="{ name: 'client.create' }" class="text-sm font-medium">Create Client</router-link>
        </div>
    </div>

    <div class="overflow-hidden overflow-x-auto min-w-full align-middle sm:rounded-md">
Just note that we are calling the route by its name “client.create” the same one that we defined in the routes file.
So not our newly added button “Create Client” will look like the below:
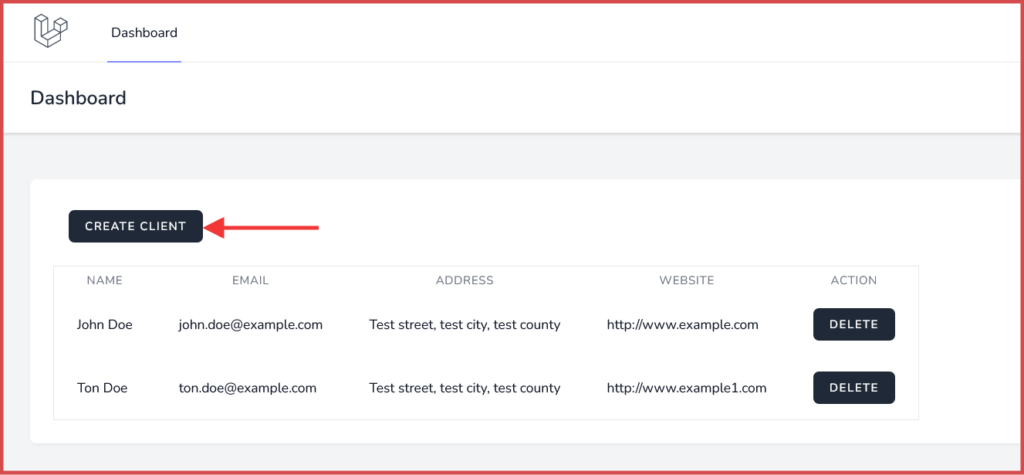
Next, click on the “Create Client” button and it will load the create client form as shown below and then just fill it up and then click on the “Create Client” button to create a client record in the database.

After clicking on the “Create Client” button, a new record will be added to the database and you will be redirected to the client listing table. Now, you will see the table like this:

Step 17: Edit Client Using Vue 3
In this step, first, we will create a ClientEdit.vue file in the components directory. We will add the client-edit form with the @submit event. So create a file and add the code as below:
resources\js\components\clients\ClientEdit.vue
<template>
    <div class="mt-2 mb-6 text-sm text-red-600" v-if="errors !== ''">
        {{ errors }}
    </div>

    <form class="space-y-6" @submit.prevent="saveClient">
        <div class="space-y-4 rounded-md shadow-sm">
            <div>
                <label for="name" class="block text-sm font-medium text-gray-700">Name</label>
                <div class="mt-1">
                    <input type="text" name="name" id="name"
                           class="block mt-1 w-full rounded-md border-gray-300 shadow-sm focus:border-indigo-300 focus:ring focus:ring-indigo-200 focus:ring-opacity-50"
                           v-model="client.name">
                </div>
            </div>

            <div>
                <label for="email" class="block text-sm font-medium text-gray-700">Email</label>
                <div class="mt-1">
                    <input type="text" name="email" id="email"
                           class="block mt-1 w-full rounded-md border-gray-300 shadow-sm focus:border-indigo-300 focus:ring focus:ring-indigo-200 focus:ring-opacity-50"
                           v-model="client.email">
                </div>
            </div>

            <div>
                <label for="address" class="block text-sm font-medium text-gray-700">Address</label>
                <div class="mt-1">
                    <input type="text" name="address" id="address"
                           class="block mt-1 w-full rounded-md border-gray-300 shadow-sm focus:border-indigo-300 focus:ring focus:ring-indigo-200 focus:ring-opacity-50"
                           v-model="client.address">
                </div>
            </div>

            <div>
                <label for="website" class="block text-sm font-medium text-gray-700">Website</label>
                <div class="mt-1">
                    <input type="text" name="website" id="website"
                           class="block mt-1 w-full rounded-md border-gray-300 shadow-sm focus:border-indigo-300 focus:ring focus:ring-indigo-200 focus:ring-opacity-50"
                           v-model="client.website">
                </div>
            </div>
        </div>

        <button type="submit"
                class="inline-flex items-center px-4 py-2 text-xs font-semibold tracking-widest text-white uppercase bg-gray-800 rounded-md border border-transparent ring-gray-300 transition duration-150 ease-in-out hover:bg-gray-700 active:bg-gray-900 focus:outline-none focus:border-gray-900 focus:ring disabled:opacity-25">
            Save
        </button>
    </form>
</template>

<script>
import useClient from '../../composable/clients'
import { onMounted } from 'vue';

export default {
    props: {
        id: {
            required: true,
            type: String
        }
    },

    setup(props) {
        const { errors, client, updateClient, showClient } = useClient();

        onMounted(() => showClient(props.id))

        const saveClient = async () => {
            await updateClient(props.id)
        }

        return {
            errors,
            client,
            saveClient
        }
    }
}
</script>
In the above code, we have defined the props with parameter id as a required field. This id will be passed from the edit button that we will add after this.
Then, we have defined the showClient(props.id) in onMounted() which will fetch the requested client data and add it into the client variable in the Compasable.
After that, we are updating data using the updateClient(props.id) Composable method by passing ID. If you check the updateClient() method then you will realize that we are sending client.value in the API which will update the client data. That’s it. It’s complex but as you practice it then it will be a lot easier than Vue 2.
Let’s now add the “Edit Client” route with a parameter :id and with a setting props: true: to the resources/js/router/index.js:
import { createRouter, createWebHistory } from 'vue-router'

import ClientIndex from '../components/clients/ClientIndex.vue';
import ClientCreate from '../components/clients/ClientCreate.vue';
import ClientEdit from '../components/clients/ClientEdit.vue';

const routes = [
    {
        path: '/dashboard',
        name: 'client.index',
        component: ClientIndex
    },
    {
        path: '/client/create',
        name: 'client.create',
        component: ClientCreate
    },
    {
        path: '/client/:id/edit',
        name: 'client.edit',
        component: ClientEdit,
        props: true
    },
];

export default createRouter({
    history: createWebHistory(),
    routes
})
Next, we will add a “Edit” button before “Delete” button in the table for each client, with router-link, in the resources/js/components/clients/ClientIndex.vue as below:
<td class="px-6 py-4 text-sm text-center leading-5 text-gray-900 whitespace-no-wrap">
    <router-link :to="{ name: 'client.edit', params: { id: client.id } }"
                class="mr-2 inline-flex items-center px-4 py-2 bg-gray-800 border border-transparent rounded-md font-semibold text-xs text-white uppercase tracking-widest hover:bg-gray-700 active:bg-gray-900 focus:outline-none focus:border-gray-900 focus:ring ring-gray-300 disabled:opacity-25 transition ease-in-out duration-150">
                Edit</router-link>
    <button @click="deleteClient(client.id)"
            class="inline-flex items-center px-4 py-2 bg-gray-800 border border-transparent rounded-md font-semibold text-xs text-white uppercase tracking-widest hover:bg-gray-700 active:bg-gray-900 focus:outline-none focus:border-gray-900 focus:ring ring-gray-300 disabled:opacity-25 transition ease-in-out duration-150">
            Delete</button>
</td>
Just note that we call the route by its name “client.edit” and passed the params: {id: client.id} the same one we defined in the routes file.
So not our newly added button “Edit” will look like the below:
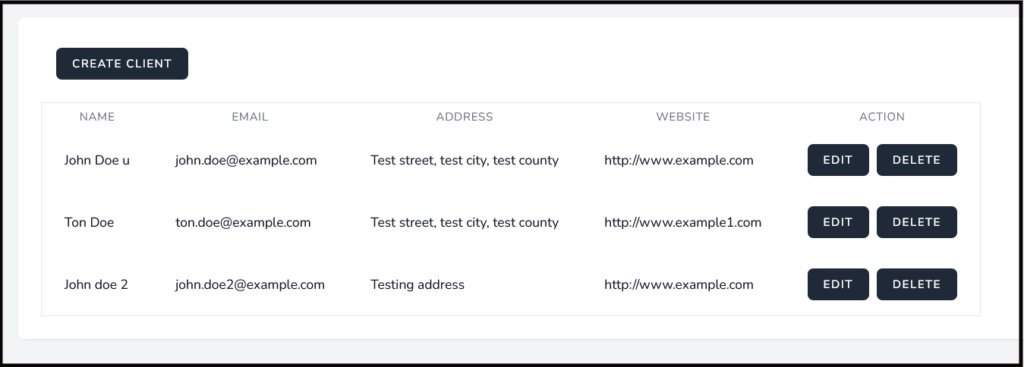

Hurray! we have completed all the steps to laravel 8 vue 3 CRUD tutorial with examples.
Additionally, read our guide:
- How To Check If An Element Is Hidden In jQuery
- Check If Array Is Empty Or Undefined In JavaScript
- How To Detect IE Browser In JavaScript
- Simple Date formatting In JavaScript
- AJAX PHP Post Request With Example
- Difference Between == vs === in JavaScript
- How To Remove A Specific Item From An Array In JavaScript
- How To Check Array Contains A Value In JavaScript
- Laravel 9 Multi Language Routes With Auth Routes
- How To Update Pivot Table In Laravel
- How To Install Vue In Laravel 8 Step By Step
- How To Handle Failed Jobs In Laravel
- Best Ways To Define Global Variable In Laravel
- How To Get Latest Records In Laravel
- Laravel Twilio Send SMS Tutorial With Example
- How To Pass Laravel URL Parameter
- Laravel 9 Resource Controller And Route With Example
- Laravel 9 File Upload Tutorial With Example
- How To Schedule Tasks In Laravel With Example
- Laravel Collection Push() And Put() With Example
That’s it for now. We hope this article helped you to learn Laravel 8 Vue.js 3 CRUD Tutorial With Composition API.
Please let us know in the comments if everything worked as expected, your issues, or any questions. If you think this article saved your time & money, please do comment, share, like & subscribe. Thank you in advance 🙂. Keep Smiling! Happy Coding!





Hi, I am getting error from Step 13.
ERROR in ./resources/js/components/clients/ClientIndex.vue?vue&type=script&lang=js (./node_modules/babel-loader/lib/index.js??clonedRuleSet-5.use[0]!./node_modules/vue-loader/dist/index.js??ruleSet[0].use[0]!./resources/js/components/clients/ClientIndex.vue?vue&type=script&lang=js) 1:0-49
Module not found: Error: Can’t resolve ‘../../composable/clients’ in ‘C:\Users\Owner\laravel-vue-demo\resources\js\components\clients’
Did you miss the leading dot in ‘resolve.extensions’? Did you mean ‘[“.*”,”.wasm”,”.mjs”,”.js”,”.jsx”,”.json”,”.vue”]’ instead of ‘[“*”,”.wasm”,”.mjs”,”.js”,”.jsx”,”.json”,”.vue”]’?
webpack compiled with 1 error