In this tutorial, we will learn how to integrate Laravel Firebase. The Firebase is Google’s mobile platform that helps you quickly develop high-quality apps and grow your business.
We are presuming that you guys already have a Firebase account with project & database setup. If not then follow Step 1 & Step 2 else skip those steps. Let’s just jump into the Laravel Firebase tutorial.
Step 1 Create A Firebase Project
You should have a Google account to create a Firebase project. If you don’t have an existing account then please create one.
After creating a Google account, you are eligible to create a Firebase project.
- First, go to the Firebase console
- Then click on the
"Add project"button as shown below
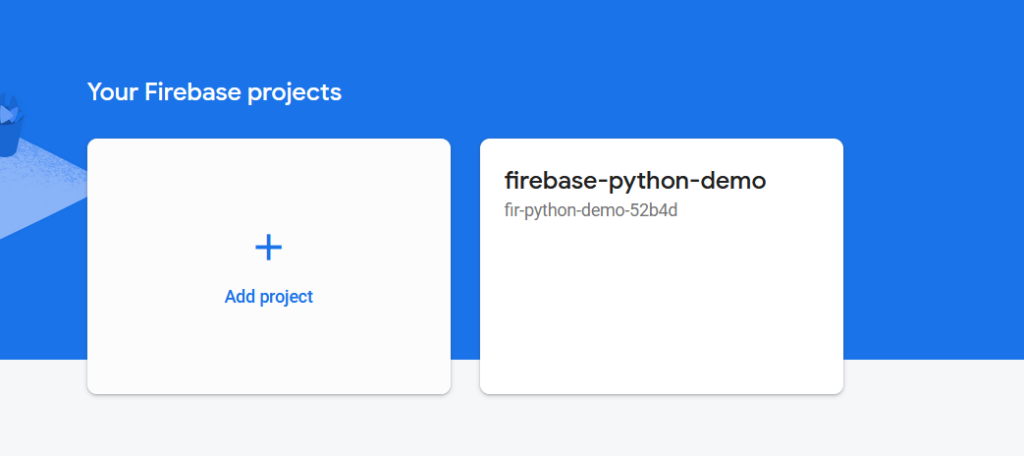
- After that, a popup will appear then enter the project name. Our is
"laravel-firebase-demo". Accept the terms and click on the"Continue"button.


- Next, it will ask for other information like Google Analytics and other things. You can enable it if you want to or skip it. After completing all the steps, it will do some process and you will see a screen like the one below:

Great! We have just finished the small step. Let’s move forward.
Step 2 Create A Database
- Now, Navigate to the Realtime Database section under the Build menu.
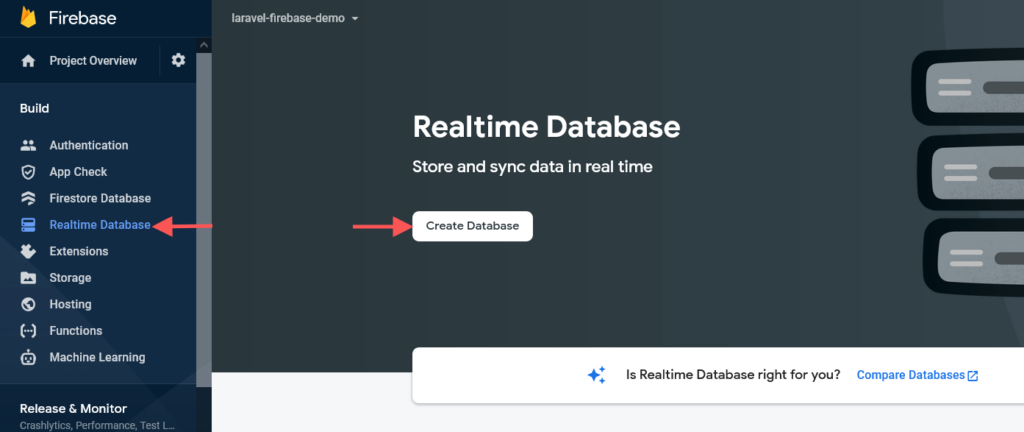
- It’ll open a popup and it will ask the database location, you can choose your own or continue with the default selection.

- In the very next step, it will ask to set up security rules. Click on
"Start in test mode"and then click on"Enable"button.

- After clicking on the
Enablebutton, you will see the following screen.

- Let’s add some data into the database manually so that we can verify the Laravel firebase connection. Let’s create a
blognode with a title & description as child node as below screenshot:
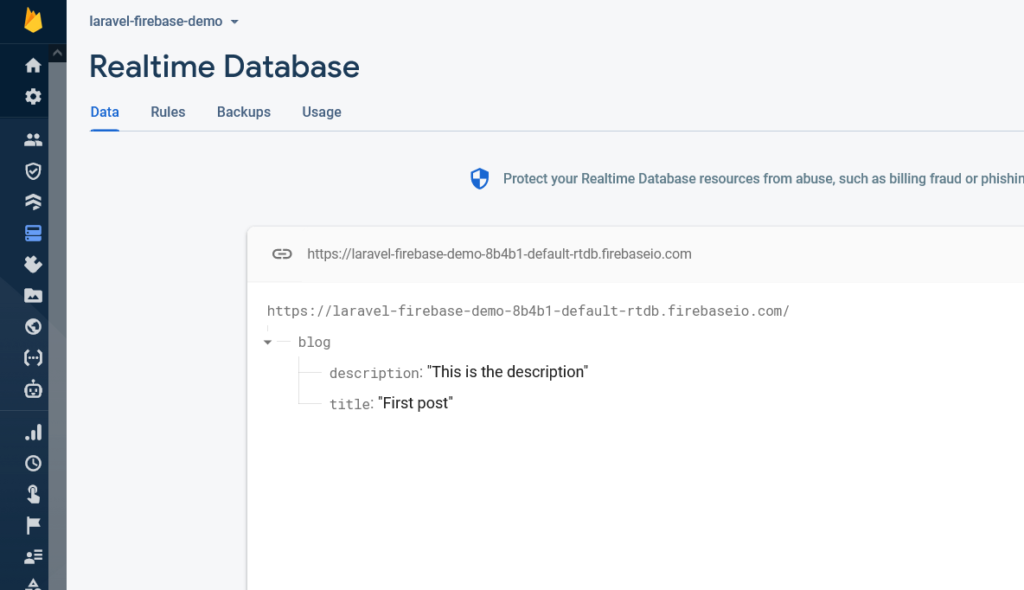
Hurray! We have just created a Firebase Realtime Database. Now, let’s generate the firebase API key.
Step 3 Generate Firebase API Key
To generate the Firebase API key, go to the Project Overview menu and click on the setting icon and select the Project Settings.
It will open a new page and from there go to the Service accounts tab and then click on the Generate new private key button as shown in the below screenshot.

Once you click on the button, it will ask you to save the file or automatically download it. The key will be created in JSON format. Move this file into the app/Http/Controller directory. Let’s now install the Laravel Firebase library.
Note: You should store the JSON file outside of your code repository to avoid accidentally exposing it to the outside world.
Step 4 Install Laravel Firebase Library
Most the Laravel developers know the term “Package” and if not then read the following definition:
A Package is a piece of reusable code that can be dropped into any application and be used without any tinkering to add functionality to that code. You don’t need to know what is happening inside, only what the API for the class(es) are so that you can archive your goal
We hope you are now clear with the Package. Let’s go ahead.
Let’s install the Firebase for Laravel package to do so run the following command in your command-line tool.
composer require kreait/laravel-firebase
Notes: While installing the package, you might get an error of sodium extension then you just need to open the extension=sodium in php.ini file.
Now, wait until your installation finishes the process

We are now done with package installations. Let’s move on next step.
Step 5 Register Route In routes/web.php
Open the routes/web.php file to add or register a new route. You can create routes as per your Controller and Method. Here, we have FirebaseController, and in that, we have index() method. So now our route will look like as below:
<?php

use App\Http\Controllers\FirebaseController;

Route::get('get-firebase-data', [FirebaseController::class, 'index'])->name('firebase.index');
Step 6 Create Controller
Let’s now create a controller. You can create it by copying any other controller code or running the following command in your command-line tool.
php artisan make:controller FirebaseController
After running the above command a new file has been created into your app/Http/Controllers/FirebaseController.php.
Open the controller file and write down the following code into it.
app/Http/Controllers/FirebaseController.php
<?php

namespace App\Http\Controllers;

use Illuminate\Http\Request;
use Kreait\Firebase;
use Kreait\Firebase\Factory;

class FirebaseController extends Controller
{
    public function index()
    {
        $firebase = (new Factory)
            ->withServiceAccount(__DIR__.'/laravel-firebase-demo-8b4b1-firebase-adminsdk-pki1t-9b49e1c4bf.json')
            ->withDatabaseUri('https://laravel-firebase-demo-8b4b1-default-rtdb.firebaseio.com');

        $database = $firebase->createDatabase();

        $blog = $database
        ->getReference('blog');

        echo '<pre>';
        print_r($blog->getvalue());
        echo '</pre>';
    }
}
Notes: Don’t forget to change the firebase private key name.json and the database URL in the above controller code and
Please refer to the documentation of the Firebase PHP Admin SDK for further information on how to use it.
Step 7: Output – Laravel 9 Firebase
Hurray! We have completed all steps to connect Laravel 9 with the firebase tutorial with an example. Let’s run the below command and see how it’s working.
php artisan serve
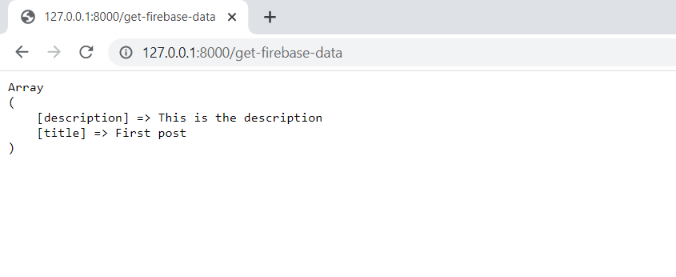
After running the above command, open your browser and visit the site below URL:
http://127.0.0.1:8000/get-firebase-data
Array
(
    [description] => This is the description
    [title] => First post
)
Additionally, read our guide:
- Laravel 9 Image Upload Tutorial With Example
- Laravel 9 Multiple Database Connections Example
- Laravel 9 Automatically Generates Sitemap With Example
- Make Model In Laravel 9 Tutorial With Example
- How To Use Where Date Between In Laravel
- How To Add Laravel Next Prev Pagination
- Laravel Remove Column From Table In Migration
- Show All Fields Of Model In Django Admin
- Laravel: Increase Quantity If Product Already Exists In Cart
- How To Update Pivot Table In Laravel
- How To Install Vue In Laravel 8 Step By Step
- How To Handle Failed Jobs In Laravel
- Best Ways To Define Global Variable In Laravel
- How To Get Latest Records In Laravel
- Laravel Twilio Send SMS Tutorial With Example
- How To Pass Laravel URL Parameter
- Set Default Value Of Timestamp In Laravel Migration
- Laravel 9 File Upload Tutorial With Example
- How To Schedule Tasks In Laravel With Example
- Laravel Collection Push() And Put() With Example
That’s it from our end. We hope this article helped you to learn Laravel 9 firebase tutorial with an example.
Please let us know in the comments if everything worked as expected, your issues, or any questions. If you think this article saved your time & money, please do comment, share, like & subscribe. Thank you for reading this post 🙂 Keep Smiling! Happy Coding!




Your this tutorial is nice and understandable. I will try it . Thank you for creating this step by step tutorial.