In this tutorial, we will learn Laravel mail send from Localhost like XAMPP, WAMP, MAMP, AMPPS. Testing is very essentials to build a high-quality product. Often, the developer wants to test the mail functionality before it passed to the QA phase.
We were developing a Laravel & Angular based CRM for a client who always demanding a pixel perfect & high-quality thing. So every-time he wants to see each & every functionality that we developed and if he doesn’t like it then he suggests lots of change. So to provide him a proof we need to implement the Localhost Laravel mail sending mechanism with some tool available like https://mailtrap.io/
Let’s start. We are preassuming that you already have a Laravel project set up on your machine either it’s a fresh installation or an existing Laravel application.
Laravel Send Mail From Localhost
01 Create Mail With Markdown Mailables
Markdown mailable is pre-built templates and components of mail notifications. So you don’t need to write separate HTML for a mail template.
Now, open your command-line tool and navigate it to the directory, our is laravel-demos where your project installed. We are using Git Bash as a command-line tool, you can use your own or you can install Git Bash from here as per your OS: https://git-scm.com/downloads
Run the following command:
php artisan make:mail OrderShipped --markdown=emails.orders.shipped
Once you execute the above-mentioned command, your mail class will be created with the name of OrderShipped inside App\Mail\OrderShipped.php.
With this, a view file also created into the resources\views\emails\orders\shipped.blade.php
You are now done with creating Markdown Mailable. Moreover, If you want to customize all the pre-built mail template component then run the following command:
php artisan vendor:publish --tag=laravel-mail
After executing the above-mentioned command, all the Mail components are published and copied to the \resources\views\vendor\mail path. Let’s move forward.
02 Add Credentials In .env File From Mailtrap
Mailtrap is an online free tool that provides safe email testing for Staging & Development. It is used to inspect and debug your email samples before delivering them to your customers.
If you have not existing account on Mailtrap then please create your account and then resume the tutorial from here.
After creating account and activating your account. You will see the following screen.

You need to select your provider from the Integration dropdown to get the credential. We are integrating Mailtrap in Laravel so we need to select Laravel and credentials will be visible as shown in the screenshot. Copy those credential and add those in your .env file like below:
MAIL_MAILER=smtp
MAIL_HOST=smtp.mailtrap.io
MAIL_PORT=2525
MAIL_USERNAME=b772b4096adfs24ac4
MAIL_PASSWORD=d1f6ce01fasdda2ce
MAIL_ENCRYPTION=tls
MAIL_FROM_ADDRESS=hello@world.com
MAIL_FROM_NAME="${APP_NAME}"
Also, don’t forget to add 'MAIL_FROM_ADDRESS' email address and run the following command to wipe the config cache.
php artisan config:clear
03 Register Route In routes/web.php
Open the routes/web.php file to add or register a new route. You can create routes as per your Controller and Method. Here, we have MailController, and in that, we have a sendMail() method. So now our route will look like as below:
Route::get('send-mail', 'MailController@sendMail')->name('send.mail');
04 Create Controller
Now, create a controller. You can create it by copying any other controller file or run the following command in your command-line tool.
php artisan make:controller MailController
After running the above command a new file has been created into your app/Http/Controllers/MailController.php
Open the controller file and write down the following code into it.
app/Http/Controllers/
MailController.php
<?php

namespace App\Http\Controllers;

use Illuminate\Http\Request;
use App\Mail\OrderShipped;
use Illuminate\Support\Facades\Mail;

class MailController extends Controller
{
   public function sendMail()
   {
        Mail::to('john.doe@gmail.com')->send(new OrderShipped());
   }
}
Now access the URL /send-mail and It will successfully send the email. Let’s verify it.
Go to the https://mailtrap.io/ and Login with your username and password. If it’s not directly take you to the Mail inbox then click on inbox link. You will see the something like below:
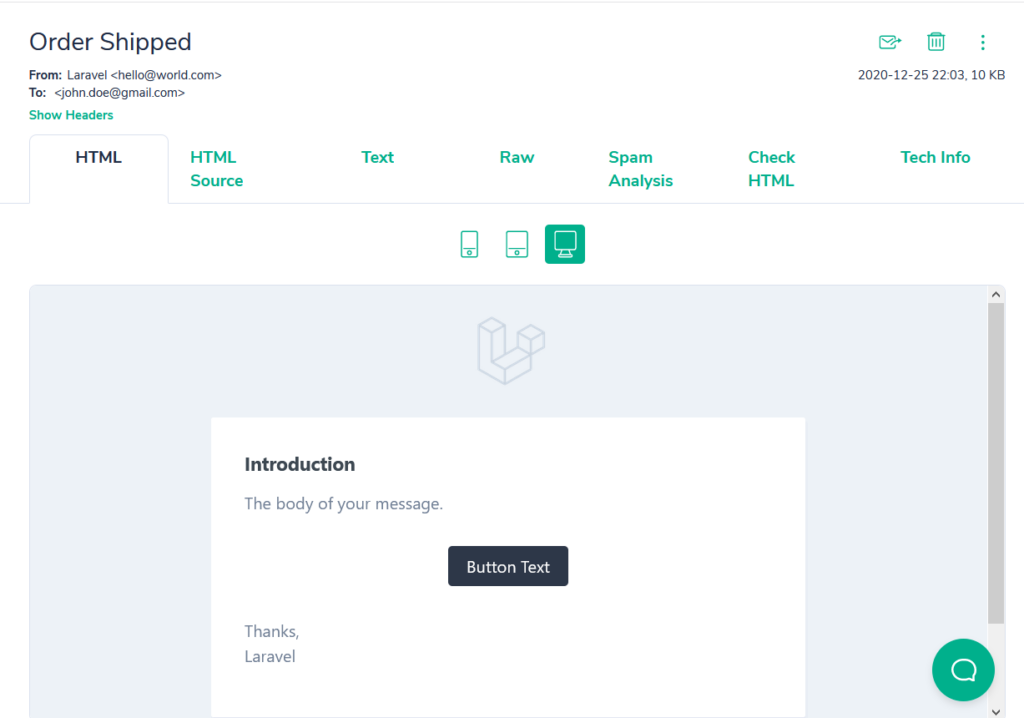
Hurray! Drum the roll.
In the same way, you can also set up other Mail providers like Mailgun, Sendgrid, Mandrill, Mailchimp, etc. to send the mail from Localhost in Laravel.
Additionally, read our guide:
- Best Way to Remove Public from URL in Laravel
- Error After php artisan config:cache In Laravel
- Specified Key Was Too Long Error In Laravel
- AJAX PHP Post Request With Example
- How To Use The Laravel Soft Delete
- How To Add Laravel Next Prev Pagination
- cURL error 60: SSL certificate problem: unable to get local issuer certificate
- Difference Between Factory And Seeders In Laravel
- Laravel: Increase Quantity If Product Already Exists In Cart
- How To Calculate Age From Birthdate
- How to Convert Base64 to Image in PHP
- Check If A String Contains A Specific Word In PHP
- How To Find Duplicate Records in Database
- How To Convert Word To PDF In Laravel
- Laravel One To One Relationship Tutorial
That’s it for now. We hope this article helped in Laravel send mail from Localhost.
Please let us know in the comments if everything worked as expected, your issues, or any questions. If you think this article saved your time & money, please do comment, share, like & subscribe. Thank you in advance. 🙂 Keep Smiling! Happy Coding!




Понятно, большое спасибо за помощь в этом вопросе.
We are glad that this article helped you. Thanks 🙂
thanks it worked
We glad that it’s worked for you. Happy coding 🙂
i got a mail error by MAIL_ENCRYPTION=tls
I just removed it MAIL_ENCRYPTION=””
and it worked.